如果大家开发过Android版的新浪微博客户端可以通过如下接口直接在客户端返回oauth_verifier
以下是我加的方法,注意增加了userId和passwd参数,大小写userId的I是大写,该问题困扰了我1晚上。
lpublic String getAuthorizationVerifier(String uid,String pass) {
l return httpClient.getAuthorizationURL() + "?oauth_token=" + getToken()+"&userId="+uid+"&passwd="+pass+"&oauth_callback=json";
l
l}
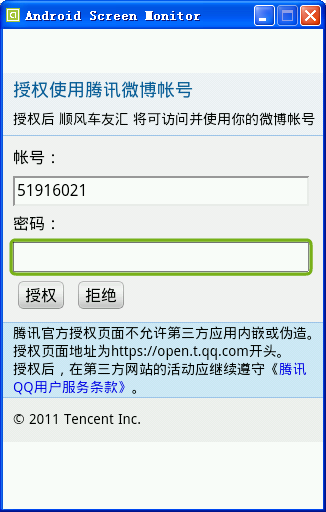
但是在腾讯中没有该方法,只能弹出页面,之后就跳转到了另一个url,而oauth_verifier在url中,不能通过代码直接获取,其实在Android中式可以解决的,如下图:
因为,Android中不同的URl可以由我们自定义的Activity组件来处理,而不一定是Webkit,实现方法如下:
编写入口Acitivity实现如下代码:
package com.qqtest;
import com.qq.weibo.OAuth;
import com.sdhjob.util.ConfigUtil;
import android.app.Activity;
import android.content.Intent;
import android.net.Uri;
import android.os.Bundle;
import android.util.Log;
import android.webkit.DownloadListener;
import android.webkit.WebView;
import android.webkit.WebViewClient;
import android.widget.Toast;
public class MainTest extends Activity {
/** Called when the activity is first created. */
@Override
public void onCreate(Bundle savedInstanceState) {
super.onCreate(savedInstanceState);
setContentView(R.layout.main);
String key = ConfigUtil.getValue("qq.weibo.appKey");
String secret = ConfigUtil.getValue("qq.weibo.appSecret");
OAuth oAuth = new OAuth(key,secret);
WebView w=(WebView)this.findViewById(R.id.ok);
// 运行完后注释掉这段 放开 32行到37行的代码
String oauthToken = oAuth.getOauthToken();
Log.d("qq","oauthToken="+oauthToken);
if( this.getIntent()!=null&&this.getIntent().getData()!=null)
{
Uri uri = this.getIntent().getData();
//验证码
String oauth_verifier = uri.getQueryParameter("oauth_verifier");
Toast.makeText(this,"验证码"+oauth_verifier, 1000).show();
}else
if(oauthToken != null){
final String url="
https://open.t.qq.com/cgi-bin/authorize?"+oauthToken;
Intent it=new Intent(Intent.ACTION_VIEW,Uri.parse(url));
this.startActivity(it);
}
}
}
红色部分是怎么实现的呢,看androidmanifest .xml:
<?xml version="1.0" encoding="utf-8"?>
<manifest xmlns:android="
http://schemas.android.com/apk/res/android"
package="com.qqtest"
android:versionCode="1"
android:versionName="1.0">
<application android:icon="@drawable/icon" android:label="@string/app_name">
<activity android:name=".MainTest"
android:label="@string/app_name">
<intent-filter>
<action android:name="android.intent.action.MAIN" />
<category android:name="android.intent.category.LAUNCHER" />
</intent-filter>
<intent-filter>
<action android:name="android.intent.action.VIEW" />
<category android:name="android.intent.category.DEFAULT" />
<category android:name="android.intent.category.BROWSABLE" />
<data android:scheme="qqweibook" />
<data android:host="qqweibo.sdhjob" /> </intent-filter>
</activity>
</application>
<uses-permission android:name="android.permission.INTERNET"></uses-permission>
</manifest>
///////////////////////////////////////////
<data android:host是在请求腾讯的api时候加入的参数
oauth_callback = "qqweibook://qqweibo.sdhjob"; // —— 用户授权后的返回地址
///////////////////////////////////////////////////////////////////
至于怎么使用腾讯API不说了,你懂的............................................................................
分享到:


相关推荐
Android的腾讯微博客户端认证源代码 实现了代码获取 授权码
基于Android的新浪微博系统开发03-微博客户端主架构 基于Android的新浪微博系统开发04-微博客户端主架构 基于Android的新浪微博系统开发05-主UI设计 基于Android的新浪微博系统开发主06-主UI完善 基于Android的新浪...
2011年沈大海讲新浪微博客户端源代码,很不错,可以拿来借鉴一下
增加了GPS和 Google map显示功能 优化的整体架构 实现了话题显示 实现了在微博应用中嵌入游戏项目(NDK开发的) 完全使用Oauth方式实现用户认证 如有问题请关注 weibo.com/shunfengche
沈大海新浪微博iphone源代码oauth登录(网络修改版)
android 新浪微博 2.0代码
实现了Oauth2.0授权逻辑 授权 登陆 发表 图片 gps
这是我从北风网上下载的,沈大海老师的代码,尚未测试。如有错误,请不要见怪,不是我不测试,是因为我的Android SDK尚未安装好,只是分享心切!毕竟我的毕业沦为就是这方面的啊~~~
新浪微博android手机客户端 沈大海
新浪微博客服端 沈大海 项目源代码
传智播客里沈大海讲师视频课程中的源码资源,基本上是搭了一个框架,通过eclipse可以部署到手机中,实现登录、微博信息获取功能,本身不是微博完整功能源码。但至少比别的这个教程源码是强太多了。
实现了游戏欢迎,帮助,游戏界面的场景跳转 图层的计划任务 按键处理 游戏逻辑 CCArray集合使用
cocos2d-x2.0 射击游戏实现 飞机类 子弹类 背景移动 用户触摸
Cocos2d-x手机游戏开发与项目实战详解_随书代码 作者:沈大海 由于原作者共享的资源为UTF-8字符编码,下载后解压在win下显示乱码或还出现文件不全问题,现完整整理,解决所有乱码问题,供大家下载。
AnimatePacker,沈大海和老G的代码
《cocos2d-x 手机游戏开发 》徐松林著 源码
教程名称: Cocos2d-x学习资料汇总【】(译)cocos2d菜单教程:第一部分【】cocos2d-iPhone_Programming_Guide【】cocos2d-x2.0射击游戏实现沈大海【】cocos2d-x2.0版本自适应屏幕分辨率AutoScaleTest【】Cocos2d-x_...
沈大海老师的Cocos Studio教程文档.
第二章介绍手机游戏的策划,包括分析玩家需求,编写策划文案,游戏原型的实现。 第三章介绍C、C++编程基础,对于游戏程序员来讲学会C语言是开发各平台游戏的必备语言,本书从实战角度,通过案例方式让读者快速...